If you are a GMP quality professional, your business line directly impacts people’s health and safety. Those people are our friends, our family, and ourselves. Therefore, you must be proactive and do your best to prevent any risk from befalling them.
Not only that but being proactive with risk management can protect you and your organization from pitfalls during tough situations.
What is FMEA?
FMEA is a powerful and proactive tool to identify potential failures in processes or designs. Most importantly, it allows you to take any scenario and evaluate how devastating it would be to your process or the consumer. According to the result, you can decide how to approach the potential problem and how much resources you should allocate to prevent it.
The FMEA goes back to the 1940s. The U.S. military used it for identifying all possible failures in a design, a manufacturing or assembly process of weapons and equipment. Their main concern – safety!
What Is the Abbreviation of FMEA?
The name FMEA describes the three steps that one has to undertake to finalize the procedure using this analysis tool:
Failure mode – What can go wrong?
Effect – If something goes wrong, what impact would it have on a process, product, or the consumer?
Analysis – What are the repercussions, and what should we do about it?
Why Do You Need FMEA?
You work in the pharmaceutical industry and responsible for the health and safety of the consumer. You cannot sit idly and wait for unwanted events to occur. Therefore, you must be proactive and anticipate problems before they happen and minimize the incident’s risk. By anticipating problems, you can prevent them and prepare for worst-case scenarios that can severely impact the consumers or the whole business, no matter how unlikely the situations to happen.
When Should You Use FMEA?
Here are some of the scenarios where you should use FMEA:
- When you design a new process
- In cases where you consider changing something in an existing process or product
- During an investigation of deviations
- Routinely through the product/process life cycle
The last three scenarios would be the most common for those who work in operational pharmaceutical production.
What Factors Does the FMEA Evaluate?
The FMEA evaluates three factors that give you the power to determine which incidents would be the most devastating to your process, product, or the consumer.
- How drastic are the consequences of the incident (Severity)?
- What is the likelihood of the failure to happen (Occurrence)?
- What are the chances for you to identify failure before it happens (Detection)?
Those three factors (Severity, Occurrence, and detection) give you the power to determine which incidents would be the most devastating to your process or the consumer.
What Types of FMEA are there?
Two types of FMEA may be relevant for you in pharmaceutical production.
- Design FMEA (DFMEA)
- Process FMEA (PFMEA)
You would approach both of the types in the same way. However, the consequences and the way you approach the results would be different. Therefore, it is essential to understand the difference between them to apply them correctly.
DFMEA
You would use DFMEA during the design phase of the process. It would help you identify problems that could arise from faulty design or technological deficiencies.
As a result of the DFMEA, you could:
- Eliminate failures with critical impact
- Lower occurrence of failures that you can’t eliminate by improving the design of the process
- Improve detection with additional control points or by implementing alternative detection techniques
After conducting a good DFMEA, you should be aware of the problems that may arise during manufacturing and be ready to face them.
PFMEA
You would use PFMEA to identify and rank failures in existing processes. In contrast to DFMEA, you cannot eliminate failures, as those are part of the designed system. However, you can improve the system by addressing the occurrence and detectability.
Scoring Systems
As mentioned above, FMEA evaluates the following parameters of an event:
- Severity (S)
- Occurrence (O)
- Detectability (D)
During the analysis, you would assign numbers to each of the parameters. The higher the number, the worse is the scenario.
After scoring each of the categories, you will need to multiple the scores. The result will be a number which is called Risk Priority Number (RPN).
S x O x D= RPN
The value of the RPN will tell you whether the risk is acceptable or not.
But what numbers do you need to assign?
There is no definite system that you must use. Instead, you need to choose a suitable scoring system for your organization and the process. Therefore, a team of experts should carefully assign the scoring based on the scientific background, product knowledge, and experience.
Here are several examples of scoring methods that you can refer to:
Standard Scoring System
Standard FMEA works with numbers from 1 to 10. Each number has a meaning behind it.
Severity

S. Afr. J. Ind. Eng. vol.24 n.2 Pretoria Jan. 2013Occurrence

Detection

Now, keep in mind that FMEA was not developed with pharmaceutical manufacturing in mind. Therefore, having a scoring system with 10 points may not always be optimal for every case. Especially when there are not enough statistics to back up the claims. In many instances, people argue for hours whether the correct score should be seven rather than eight.
You can learn more about the original scoring system in the article- Failure effects and resolution of modes: a novel FMEA treatise for finalizing mould designs in foundries.
We will look at calculating RPN at a later stage.
WHO Innovative Scoring System
World Health Organization (WHO) presented has presented a guide called Deviation Handling and Quality Risk Management. They meant the guide for manufacturers of prequalified vaccines for supply to United Nations agencies, and it has a very interesting scoring system:
Detection
Table 4: Innovative rating for Detection (D) by WHO

Occurrence
Table 5: Innovative rating for Occurrence (O) by WHO

Severity
Table 6: Innovative rating for Severity (S) by WHO

This scoring system is excellent for investigating process deviations of aseptic products, as it doesn’t leave room for error if there is suspicion of patient harm.
Here are examples of interpretations of the RPN:

As you can see, with this scoring system, it doesn’t matter how low the occurrence and good the detectability are. If the risk is critical, the RPN will be critical as well. Such scoring is not very common.
Simplified Scoring System
Here is a simplified scoring system of 1 to 3 that can suffice for most scenarios during a risk assessment of a process or a quality control deviation:
Detection
Table 7: Simplified rating for Detection (D)

Table 8: Simplified rating for Occurrence (O)

Table 9: Simplified rating for Severity (S)

Here is a possibility for RPN translation:

To evaluate the scores that fall under ‘Moderate’ and check whether an action is required, you need to familiarize yourself with the term ALARP.
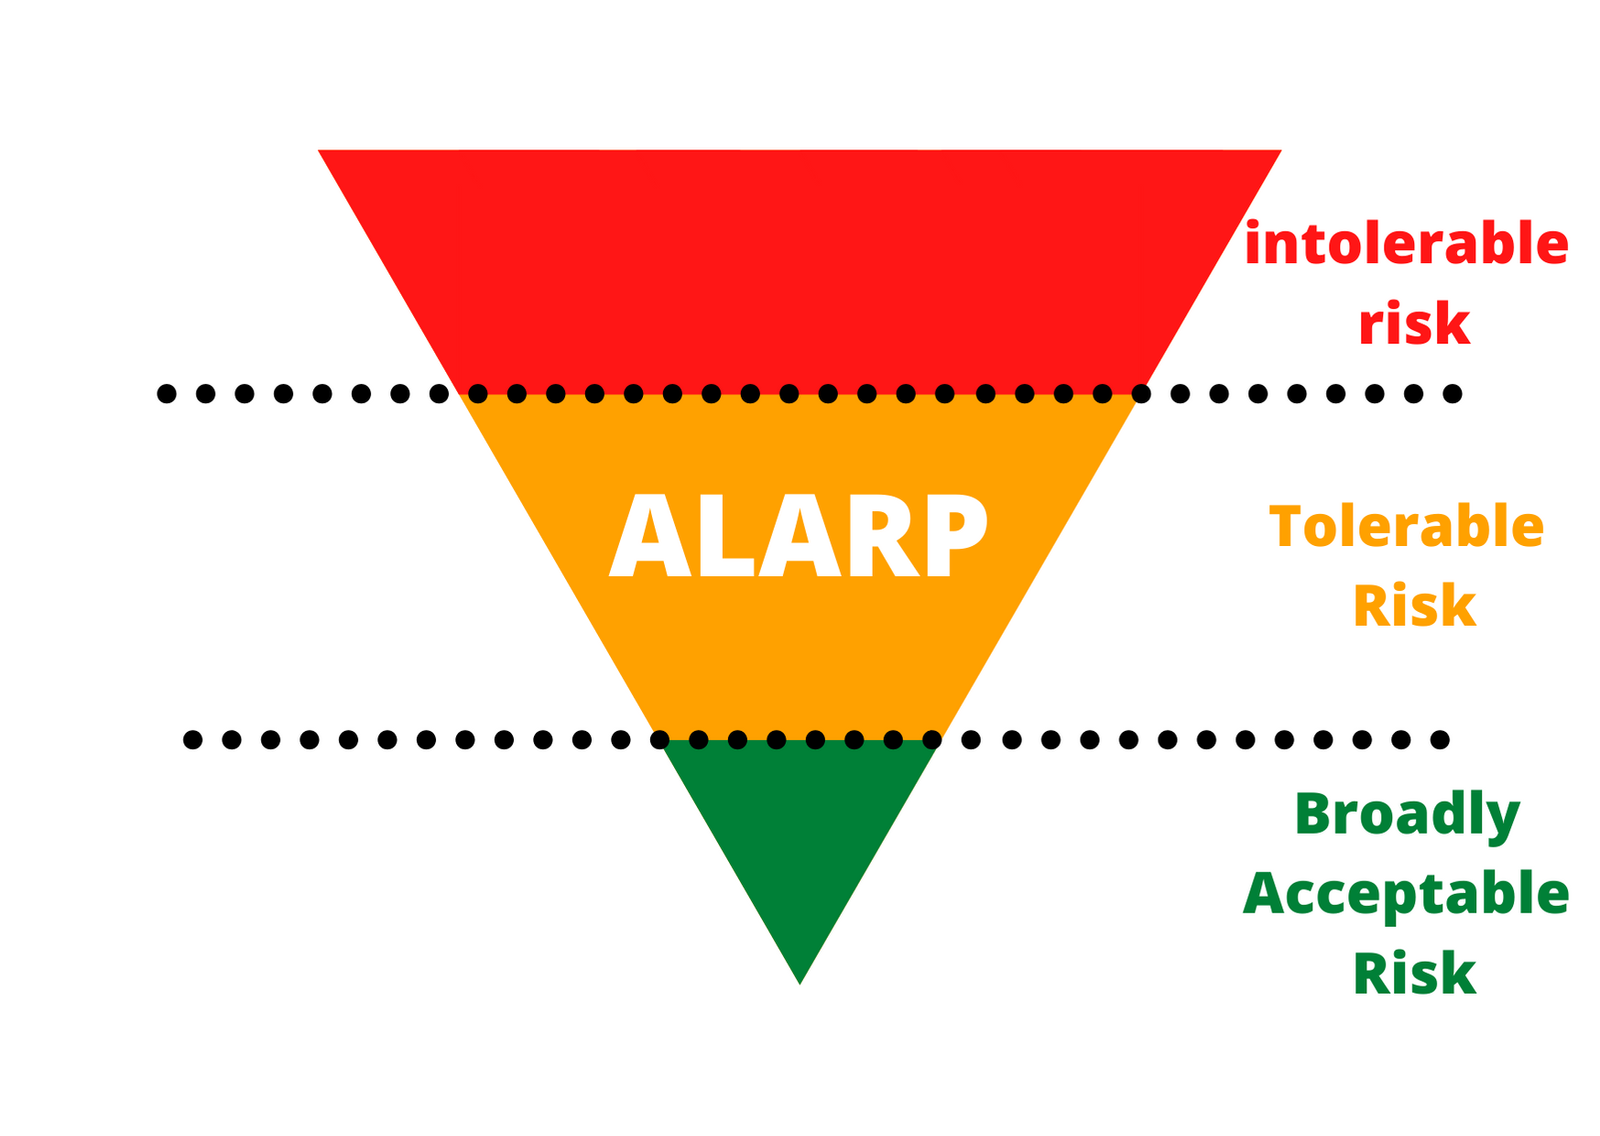
What is ALARP?
As Low as Reasonably Practicable (ALARP) is a tolerable risk region. It is an acceptable risk level that you cannot reduce any further without spending resources that are not proportional to the risk. In other words, the benefit doesn’t justify the invested money, time, and effort.
The United Kingdom’s parliament introduced this concept in 1974 as part of the Health and Safety at Work Act, and Its goal is to maintain safe working conditions, eliminating any risk to the health of the employees. Although ALARP has a work safety connotation, the concept has spread to different industries worldwide, including engineering, medical device, and pharma.
- Intolerable risk: If the risk is in this region, you cannot demonstrate and must take action to reduce the risk whatever the cost is.
- Tolerable risk (if ALARP): If the risk falls in this region, then you must perform a case-specific ALARP demonstration.
- Broadly acceptable risk: If the risk falls in this region, you can demonstrate that you achieved ALARP by referring to standards and established best practice procedures.
Using ALARP in Combination with FMEA
Here is how you can use it in combination with an FMEA – You will need to look at the events where RPN falls between the acceptable and the not acceptable region (yellow). Then, you will want to weigh the consequences of the harmful events against the resources you need to invest in lowering the score.
There are no specific rules that define what risks can stay within the ALARP limit and which you must reduce. However, there are some questions you can ask yourself to help you reach the right decision:
- Is best practice implemented for this process step?
- What else can you do to reduce the risk?
- What additional control can you introduce to the process?
After you have mapped the possible changes that you can make to reduce the risk, you and your team must consider:
- What risk reduction would the change bring?
- How much would it cost?
- How long would it take?
- What benefits would the initial investment bring in the long run?
If you can prove that the sacrifice in resources is too high compared to the reduced risk, you have reached ALARP. Therefore, the risk is tolerable. Otherwise, you need to invest the resources and reduce the risk to the broadly acceptable area.
How to Perform an FMEA
I have broken the FMEA performance in to seven stages, to make the process clearer.
Stage 1: Define the Objective
Decide what the goal of the FMEA is and what you want to achieve. Depending on your goal, you would use a suitable FMEA template.
Choosing FMEA Template
Here is an example of a standard FMEA template (the adjustable part):

In this part of the standard FMEA you follow this steps:
- At first, You will map your processes and list everything in the column Process Step.
- Afterward, you will brainstorm everything that could go wrong.
However, for the best results, you should modify the FMEA for your purposes. That way, it will be easier to stay focused on the goal.
Modified FMEA Template (Example Nr. 1- Out-of-Specification Investigation)
You got an out-of-specification result in a final product. Therefore, you would assess whether it has an impact on the safety and efficacy of the drug. In this case, your FMEA template would look like that:

Modified FMEA Template (Example Nr. 2- Comparing Raw Materials)

In this example, you want to change the supplier of critical raw material. In such a case, you would have to assess whether the change may influence the drug product. E.g., a different manufacturing method of raw material, packaging, transport, etc.
Stage 2: Identify the Variables
The foundation of performing a successful FMEA is identifying each step of a process or the items you want to analyze.
As an example, let us look into the following short example:
A company manufactures a drug with a highly potent active pharmaceutical ingredient (HPAPI).
Let’s assume we want to do analyze the process of preparing popcorn in the microwave. We all know how complicated this process can be. As getting from white and tasty, popcorn to scorched charcoal is a matter of seconds.
Let us look at this delicate process, where so much can go wrong:
- Remove plastic overwrap
- Unfold the bag and place it in the middle of the microwave with the marked side up.
- Microwave at 1000 mW
- Listen carefully! And stop the microwave as soon as the popping sound ratio slows to down a pop every 2 seconds
- Remove the hot bag from the microwave, and open it by pulling the sides. Beware of hot fumes.
Here how it would look like in the FMEA table (For simplicity, only steps 1 and 2):

TIP! Always work as a team and never do an FMEA by yourself. Otherwise, the result will be biassed and inaccurate. Therefore, choose five people from different areas of expertise for the best output.
Stage 3: Brainstorm potential failures
At this stage, you would sit down with your team and brainstorm anything that can go wrong. You can use mind-maps or idea boards before writing the FMEA table’s failures to improve the process.
To keep it simple, let us look at the third step only (Microwave at 1000 mW). In this phase, the operator must set the power correctly to the required setting. There are at least two possible failures here: The operator sets the capacity too low or too high. If he puts it too high, the popcorn will burn. If he sets it too low, the corn kernel won’t pop.

TIP! Bring experts from sister departments for a broader view. For example, if you want to analyze a deviation during product X production, bring a production expert that works in the production of product Y. By doing so, you would eliminate biases and routine-blindness.
Stage 4: Assign SOD Scores
After listing all the possible failures, it is time to evaluate them, and you would do it according to the previously discussed parameters – S, O & D.
For this example, we will use the simple scoring system of
1- Low Risk / Low Occurrence / High Detectability
2- Moderate Risk / Moderate Occurrence / Moderate Detectability
3- High Risk / High Occurrence / Low Detectability
Tip: Add additional columns to the FMEA, where you can justify each of your decisions and document them. Remember that everyone must understand the results even if he weren’t part of the team. Additionally, even people on the team can forget the reasons for the decisions.
For this, let’s take a scenario that relates better to the pharma industry, than the preparation of popcorn. We will look at some of the stages of biotechnological production processes:
- The purity of the inoculum
- pH
- Sterility of final bulk
When we ask the question, what can go wrong with the event or feature we get the following options:

Now comes the critical part, of assigning the right severity scores to each of the parameters S, O and D.
Let’s start with the Severity:
Q: What impact would contamination of the inoculum have on the final product and the process if you don’t detect the failure in time?
A: The impact would be severe, and it doesn’t matter what causes it- Material failure or medium contamination. Such an event poses a high risk to consumers, as it can harm their health. The impact on the process is also severe because even if you detect the issue at a later stage, you would need to stop everything and start over. It means that the score would be – 3.

After Severity, let’s take a look at Occurrence:
Q: What causes the step or feature to go wrong? (how could it occur?)
A: In this case, we have multiple options:
1.1 Contamination during preparation – Operator, doesn’t follow best practice aseptic technique.
– People are the main cause of contamination in clean rooms. It doesn’t happen all the time, but it may occur, even with good training. Therefore, we will give it a score of 2.
2.2 Contaminated raw materials.
– Such contamination is rare, as in this case, both the manufacturer and the QC lab messed up. Therefore, I would give it a score of 1.

Pay attention to the fact, that one failure may have multiple causes. Therefore, it is vital to explore all possible options.
Now, let’s move to detection:
Q: What controls exist that either prevent or detect the failure?
A: In this scenario, we would name the quality tests we use, such as Macroscopic / Microscopic detection methods. Those methods are good but are not perfect. For example, researchers have found that PCR methods are 10-fold more sensitive to detect parasites than microscopy. Therefore, I would give those detection methods a detection score of 2.

Now, we have finished investigating one feature in the process. Afterward, you would need the same assessment for each step or feature in the process. It may be two more assessments, or 1000, depends on your process. Therefore, you need to take each step seriously and input the same good amount of energy into it.
In our example, I have presented two additional steps, which I would leave to you as an Exercice:

Stage 5: Assess the Results
After assigning the S, O, and D scores, we come to the fun part of calculating the RPN score and evaluating the risk (According to our system). I’ll remind you that calculating the RPN score is easy. You just need to multiply the S, O, and D numbers by each other. Here is the result from our case above:

As a reminder, here is the scoring system we have chosen for this example:

According to this system, one failure has two causes. One is a high-risk cause, while the second one is moderate. It means, that we must address both of the issues, although with different priorities, or more correctly, with a different endgame in mind.
What I mean by that, is that we must address the high-risk event (contaminated culture media) and find a solution, no matter the cost. On the other hand, we have the Moderate Event (Material failure) which we can address through ALARP evaluation. If we can prove that we have achieved ALARP, we won’t have to introduce any changes regarding it to the system.
However, it is wise first to address the high risk event, in any case, as the solution may reduce the risk for both of the events. And, that’s exactly what we will be doing in the next stage.
Stage 6: Assigning Corrective and Preventive Actions (CAPAs)
In this stage, you need to start thinking about solutions to the problems. Remember, that you cannot influence the severity, therefore you need to concentrate on improving detection and/or reducing the occurrence rate of the event.
How can we reduce the RPN score in our case? As I mentioned, microscopic tests are not perfect, so we could introduce better detection methods, such as PCR. Thus, improving the Detection score to 1.
Now, let’s take a look at the wonders that one improvement can do:

And look at that! With one action we managed to reduced the risk of both events!
Material failure is now in the green area, and with the purity of inoculum we managed to reduce the risk to an area, where we can explore ALARP.
Tip! When you assign CAPAs, make sure to assign responsible people and think about all the required procedures, such as validation.
Hurray, we are done with this forever!

Well… not quite.
Stage 7: FMEA Life Cycle
After coming up with CAPAs, you need to ensure that the assigned people perform them on time.
Make sure you distribute the FMEA as widely as you can to get good feedback about the results.
However, the FMEA doesn’t rest even when all the CAPAs are closed. You must review each process regularly and make performance checks to make sure your CAPAs were effective.
Remember, problems don’t go away as soon as you sign a paper. You must actively track the trends and update the FMEA accordingly.
Congratulation!
You did it! After reading this manual, you should clearly understand what FMEA is and how to apply it correctly.
However, your journey towards mastery of risk management mastery doesn’t end here. There are still many tools and approaches you must learn to become a real risk mitigation champion in your environment! So keep learning and make sure to visit our free GMP webinars.
See you there!
FMEA Process Summary
- At first, You will map your processes and list everything in the column Process Step.
- Afterward, you will brainstorm everything that could go wrong.
- Then, you will assess the impact of the event if it takes place. This will determine the event’s Severity (S).
- Consequently, you will contemplate the reason for the event’s occurrence and its probability. This will determine the Occurrence (O) score.
- After that, you will have to review the controls you have to detect the event before it happens. This will determine the Detection (D) score.
- Finally, you will see multiple scores SxOxD and get your RPN.
- You will then determine how to act following your scoring system.
- You will then create CAPAs and a follow-up timeline.
- Review the FMEA again after a suitable amount of time to make sure no new risks arise.